blender
twitter.com
blender
test
test
blender
twitter.com
blender
test
test
Would it be possible to give badges or something to members who have +X number of gemmed posts? There are quite a few members here who routinely give some great little gems, and it would be great to see some recognition next to their discord handle.
it seems like something that should be part of osl, unless there’s a reason for it to be render engine specific
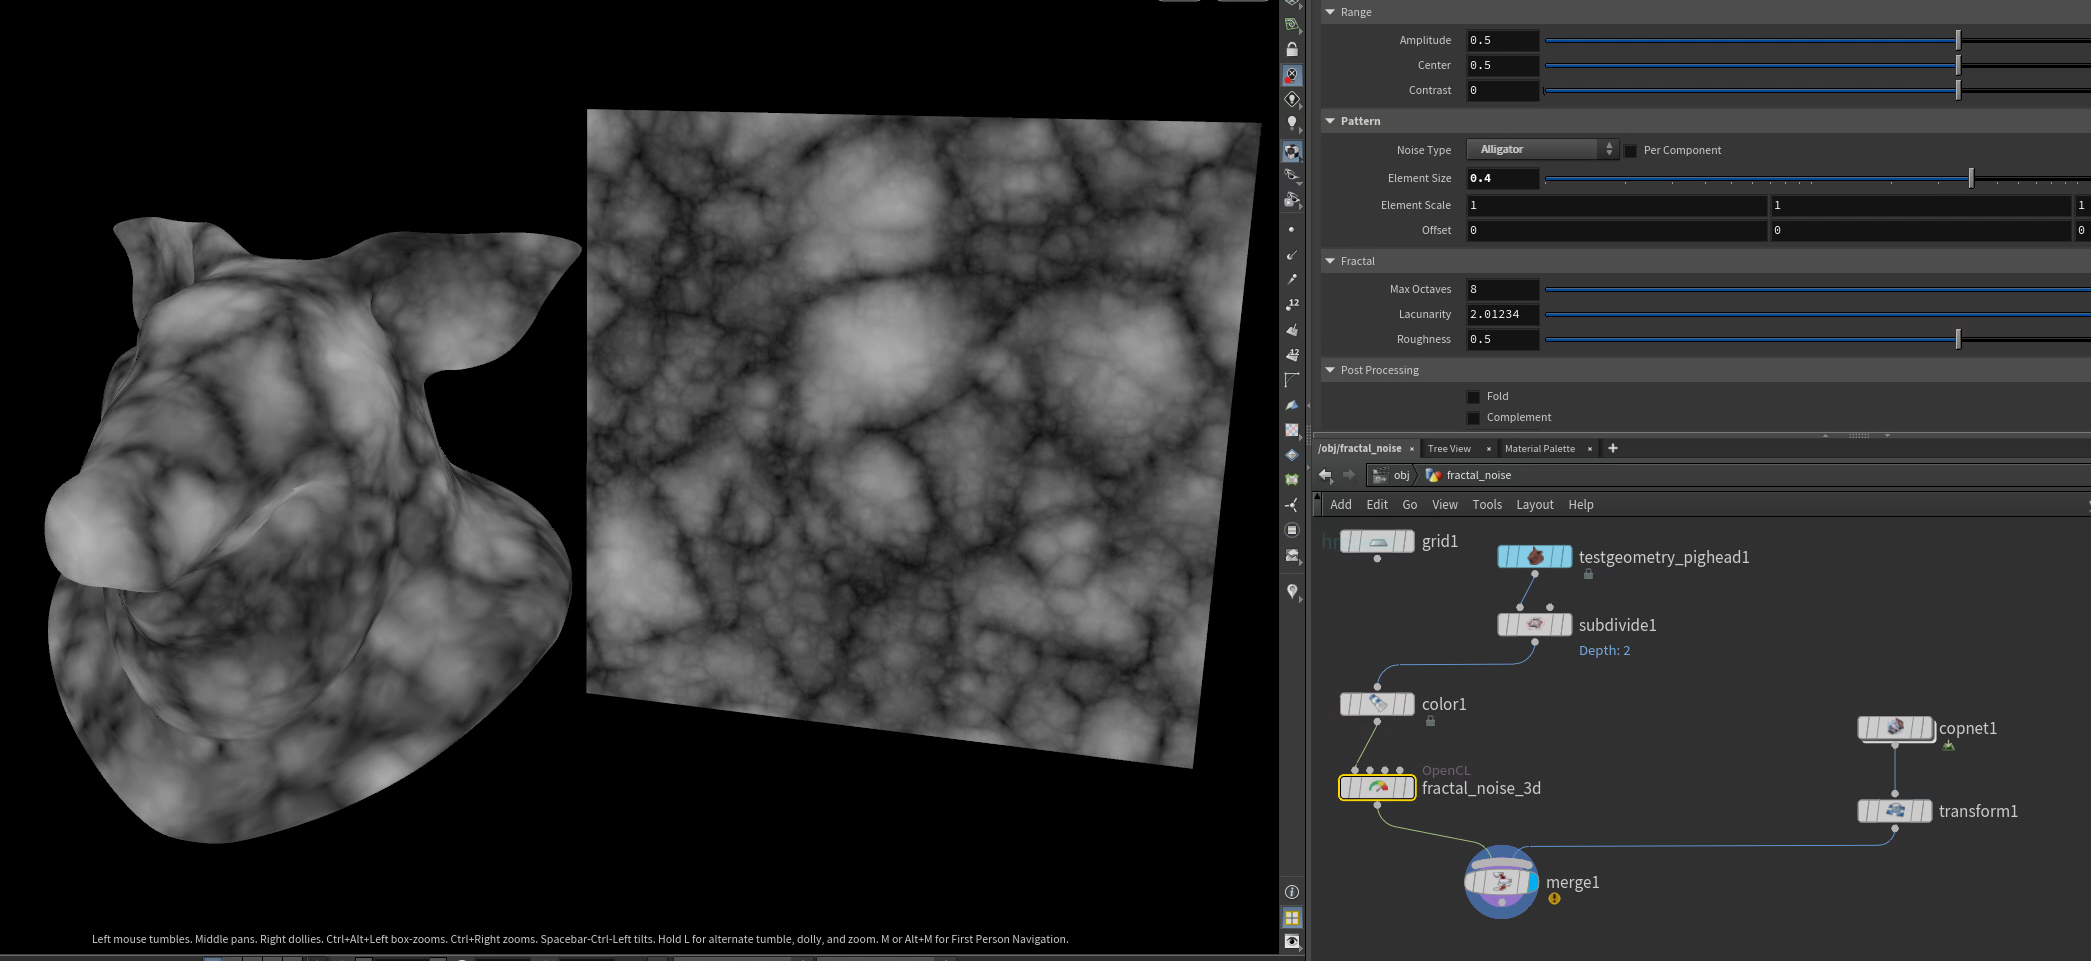
i just ported fractal noise 3d from cops to sops, if this is the one you mean just swapped the layer bindings to attribute bindings
running on 3d geo
Attachments in this post:
http://fx-td.com/houdiniandchill/wp-content/uploads/discord/20262407/02/26/image.png
http://fx-td.com/houdiniandchill/wp-content/uploads/discord/20262407/02/26/fractal_noise_3d.hip
“`py
def wrap_in_network_box( nodes: list[hou.Node], name: str | None = None, comment: str | None = None, color: hou.Color | None = None, ) -> hou.NetworkBox | None: “””Wraps nodes in a network box sized to fit them. Args: nodes: Nodes to enclose. Must share the same parent. name: Optional box name. Auto-generated if omitted. comment: Optional comment shown in the box header. color: Optional box color. Returns: The created network box, or None if nodes is empty. Raises: ValueError: If nodes do not share a common parent. “”” if not nodes: return None parent = nodes[0].parent() if any(n.parent() != parent for n in nodes): raise ValueError(“All nodes must share the same parent.”) box = parent.createNetworkBox(name) for node in nodes: box.addNode(node) if comment: box.setComment(comment) if color: box.setColor(color) box.fitAroundContents() return box
# Wrap the current selection: wrap_in_network_box(hou.selectedNodes(), comment=”My group”)“`
Oh wow ok, that sounds cool. Might have to look into that
Attachments in this post:
http://fx-td.com/houdiniandchill/wp-content/uploads/discord/20265106/23/26/COPs_Global_Illumination.hiplc
By the way, I will go back to the **quadrangulate **discussion we had a while, my geometry comes triangulated as it comes from a game engine and doesn’t keep quads.
In the end, I replaced the dissolve node by a wrangle in the node and it runs way faster, I basically recreate polygons myself. I will put it there if someone needs it
It might not work with all cases, works in mine, though
“` int ordered_poly[]; int shared_pts[]; int vtx_tmp[];
// Get the edge group from the first input int pts[] = expandedgegroup(0, “long_edge”);
// Loop through the point pairs making up the edges for (int i = 0; i < len(pts); i += 2) { // Get positions of the two points for the current edge int first_hedge = pointedge(0, pts[i], pts[i+1]); int first_prim = hedge_prim(0, first_hedge); int second_hedge = hedge_nextequiv(0, first_hedge); int second_prim = hedge_prim(0, second_hedge); int vtx1[] = primpoints(0, first_prim); int vtx2[] = primpoints(0, second_prim); shared_pts = array(pts[i], pts[i+1]); // get unique points int p_shared_a = shared_pts[0]; int p_shared_b = shared_pts[1]; vtx_tmp = vtx1; removevalue(vtx_tmp, shared_pts[0]); removevalue(vtx_tmp, shared_pts[1]); int p_unique_0 = vtx_tmp[0]; vtx_tmp = vtx2; removevalue(vtx_tmp, shared_pts[0]); removevalue(vtx_tmp, shared_pts[1]); int p_unique_1 = vtx_tmp[0]; // Find winding int idx_a = find(vtx1, p_shared_a); int idx_b = find(vtx1, p_shared_b); if((idx_a + 1) % 3 == idx_b){ ordered_poly = array(p_unique_0, p_shared_a, p_unique_1, p_shared_b); } else { ordered_poly = array(p_unique_0, p_shared_b, p_unique_1, p_shared_a); } // put prims to delete in a group setprimgroup(0, "__to_del", first_prim, 1); setprimgroup(0, "__to_del", second_prim, 1); // Create polygon int new_poly = addprim(0, "poly"); foreach(int p; ordered_poly){ addvertex(0, new_poly, p); } } “`
downloadable
Attachments in this post:
http://fx-td.com/houdiniandchill/wp-content/uploads/discord/20260206/18/26/Fantasia_2000_1999_The_Firebird_Suite_Effect_Pencil_Tests_Videos-02.mp4
APEX Bike Chain idea. Someone on the sidefx forums was looking for a solution and this was a quick solution I came up with and shared it. Also, sharing it here. When I get more time, I’m going to rebuild a more practical setup and share it as well.
basically deconstructing/reconstructing a setup @mestela shared on the forums about 8 years ago
Attachments in this post:
http://fx-td.com/houdiniandchill/wp-content/uploads/discord/20263006/12/26/apex_chain_concept_v001.mp4
http://fx-td.com/houdiniandchill/wp-content/uploads/discord/20263006/12/26/apex_chain_v002.hiplc
I made a thing awhile ago wedging over Houdini’s white water solver and saved them all in Google drive if this helps anyone.
drive.google.com/drive/folders/1Rxe1eNgJ8kkPoJna0JBrRxDlRgxYEAgi
https://youtu.be/72G3Y2RwExo?si=rvd-43ygNuCCpli6
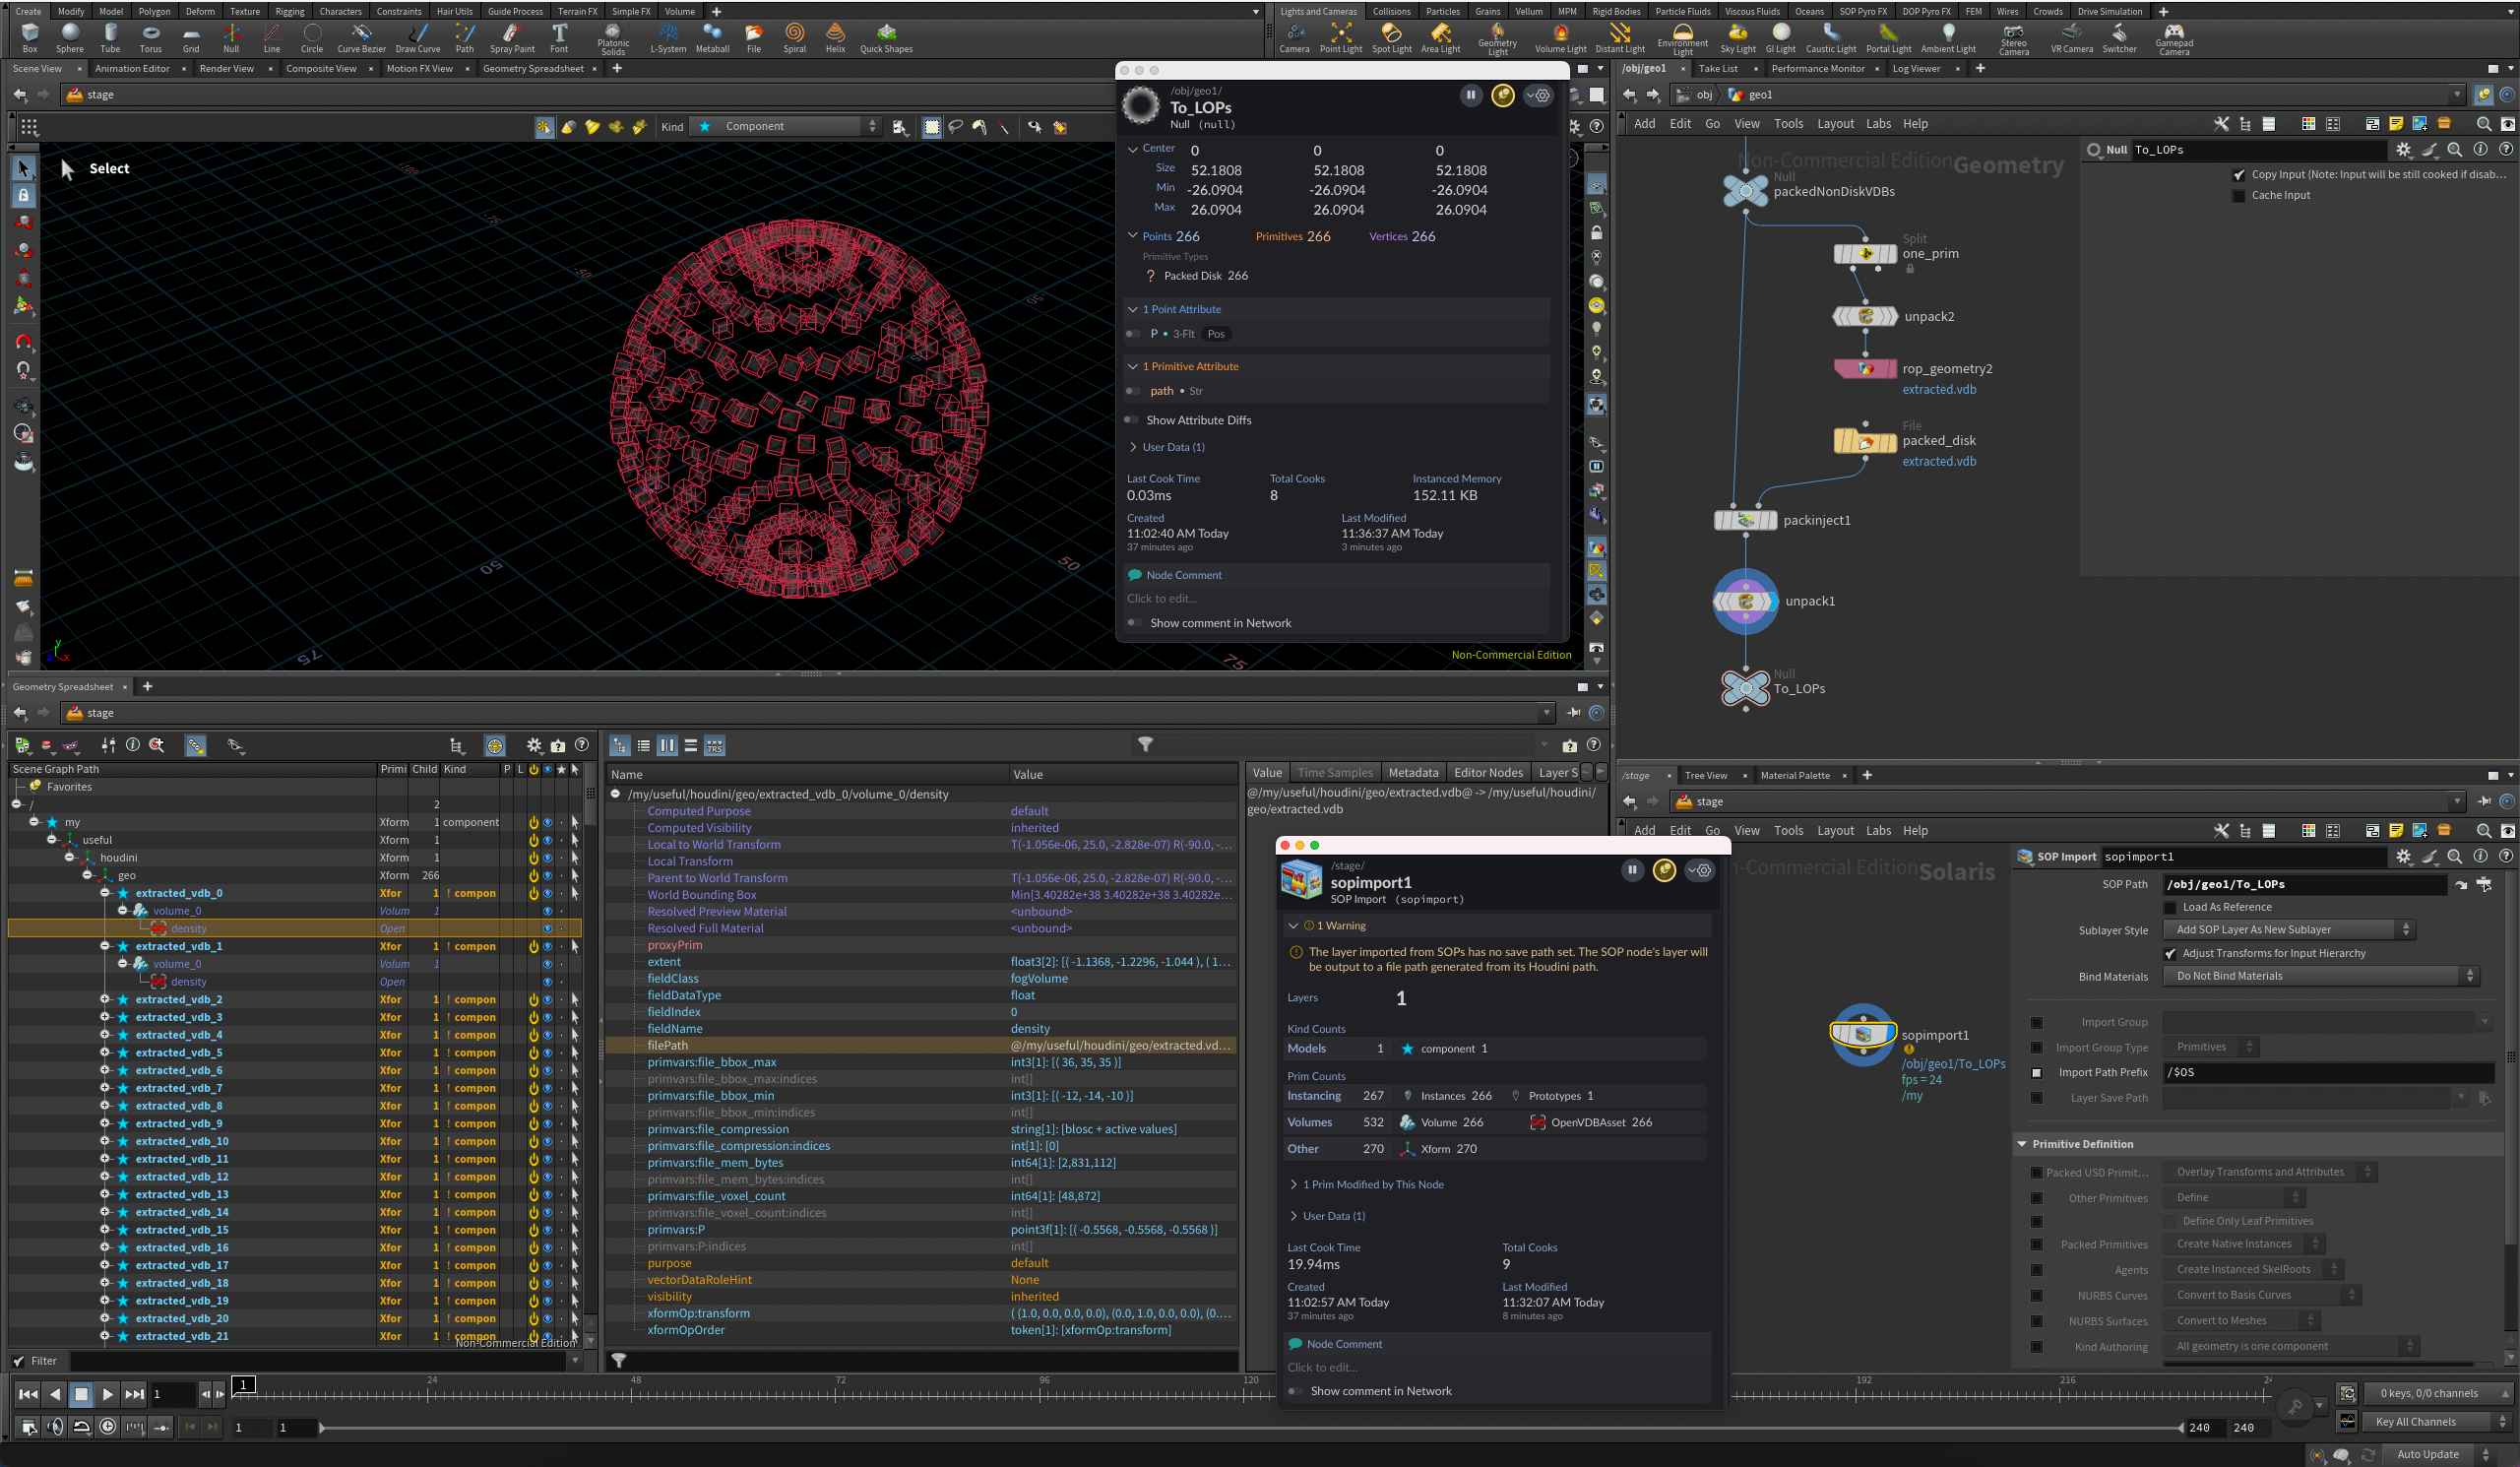
I found if you sop import packed disk VDBs it happily does the right thing and you get instances referencing the original .vdb files, no extra caching required… so if you’ve got packed (non-disk) VDBs as .bgeo you should be able to turn that into a packed disk equivalent: – unpack 1 prim with Apply Transform disabled to get the original VDB – save it as a .vdb, load it back in as a packed disk with a File SOP – use Pack Inject to turn the packed VDB setup into packed disk VDBs – change or delete the path attrib, because packed disks have the file path in there and LOPs will use it to create a transform hierarchy from your on-disk folder structure which is just insanely confusing the first time you see it lmao
Attachments in this post:
http://fx-td.com/houdiniandchill/wp-content/uploads/discord/20264106/10/26/Screenshot_2026-06-10_at_11.41.14.png