You could use the kinefx library “` #include
int ancestors[] = getancestors(0,@ptnum,-1); int root = ancestors[-1]; s@root_path = point(0,”path”,root); “`
Category: hou-rigging-anim
Archived post by Bender
Jack Zaloga:
motherf… paste not working
He’s adding keyframability now
Attachments in this post:
http://fx-td.com/houdiniandchill/wp-content/uploads/discord/20215809/03/21/58fe84b6-f5c0-4ca8-b801-ee46658c1b31.gif
Archived post by friedasparagus
You could look at the MotionClips? The MotionClip Extract node allows you to create motion trails from a given clip
There’s a couple of gotchas to be aware of when working with the RBD sim, the red-coloured wrangles are where these little bits get taken care of. See if the scene makes sense and/or it’s or any use for what you were thinking of 😅
Attachments in this post:
http://fx-td.com/houdiniandchill/wp-content/uploads/discord/20215604/20/21/rbd_test.hip
Archived post by mestela
Archived post by SquidBean
cool I will be in hangouts in 2mins
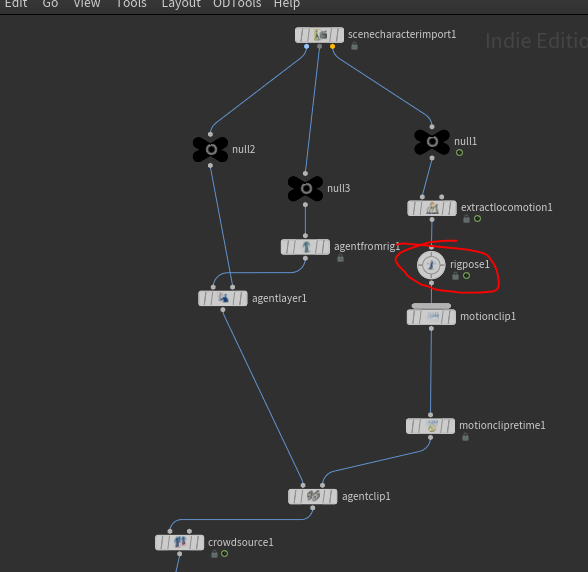
Okay, so I got something working finally!
the key here was to edit the rig, and add a transform null in the right place.
and then extract that transform using the extractlocomotion sop
note that my locomotion reference is NOT the null I am actually animating, but the one being transformed by it, still being the key null in the skeleton.
And that it works… I can use the motion tools (rigpose) to mess it all up again 😀
Attachments in this post:
http://fx-td.com/houdiniandchill/wp-content/uploads/discord/20204210/23/20/kinefx_agent_locomotion_fail_02.gif
http://fx-td.com/houdiniandchill/wp-content/uploads/discord/20204210/23/20/unknown.png
Archived post by friedasparagus
Hey! Sorry for missing all the rigging fun (!) here… Unfortunately discord has been squeezed out of the every day happenings 😦 @TOAD$TORM One approach you could take to a planar lookat is to slightly bastardise the build in lookat constraint. The lookat constraint uses the same logic that you might be used to in the `maketransform(v@z, z@y)` vex function – i.e. the up axis gets corrected to form a rigid transform after the z and x axes have been determined. We can leverage that to keep the resulting ‘forward’ vector at 90 degrees to a given ‘up’ vector by switching them around: Set the ‘lookat’ target to the ‘up’ vector and the ‘lookat-up’ target to the position of the driver object – the result of which being that the constraint output swivels around the axis set by the ‘lookat’ input. By default this would give us a transform with the ‘Y’ axis pointing towards the driver, but fortunately the lookat constraint lets us set which axis points to ‘target’ and ‘up’ which will give us something like this
The other potentially nifty thing here is that because we’re setting the ‘lookat’ based up the DRIVEN objects own world space, we can modify the DRIVEN objects orientation and the constraint will continue to swivel around its own axis
And here’s the belated example of rigging a planar chain of more than 2 bones with a kind of ‘stiffness’ control that allows us to control how the solution is distributed between two-bone segments… Maybe it’s useful/helpful?
Attachments in this post:
http://fx-td.com/houdiniandchill/wp-content/uploads/discord/20194211/14/19/lookat_zx_plane.hip
http://fx-td.com/houdiniandchill/wp-content/uploads/discord/20194211/14/19/zig_zag_bones_with_quasi_stiffness.hip
Archived post by aswaab
@flight404
here’s a chops way of doing it. I have something in there that will remove any scaling from the world cam/nulls, etc.
Knowing the CHOPS way is cool because you can do things like time-shift, retime, filter, sample, etc. Good to know even if not for your specific case tonight.
Attachments in this post:
http://fx-td.com/houdiniandchill/wp-content/uploads/discord/20194208/22/19/get_world_cam.hiplc
Archived post by ajk48n
yeah, thanks I’ll check it out. This is literally just my prep so I begin setting up cloth tutorials
at the risk of looking inefficient, but for future posterity when I forget how I did this, here is a bit of code to transition between multiple clips in an agent
“`int clipNum = 3; float blend = chf(‘blend’); float b[] = array(0,0,0);
for (int i=0;i
Archived post by bonsak
Sample rate in chops is not always tied to the frames pr second you operate in. If you are sampling audio for example you might want higher sample rates. But i agree it could at least be $FPS. I put this in my houdini.env: “`FPS = 25 HOUDINI_CHOP_UNITS = frames“` This sets FPS in your hip to 25(i dont do any film work), sets Sample Rate in chops to 25 and Unit in chops to Frames. I always mess up when its set to Seconds(default)
Archived post by matte
agent full body ik
Attachments in this post:
http://fx-td.com/houdiniandchill/wp-content/uploads/discord/20191603/28/19/agentfbik.hip